When you picture a yoga backbend, something like Wheel or Bow probably comes to mind. These poses showcase the perfect U shape we associate with spinal extension, which usually comes courtesy of the resistance created through pushing through your hands and feet. When you’re able to work against the floor or through a bind, you can more easily achieve deep backbends.
In a pose like Locust, however, you don’t have much to push against, except where your pelvis meets the floor. While anchoring through that point of contact is key, you must also recruit the muscles of your legs, abdomen, and back to overcome gravity and lift your chest and feet away from the ground. The strengthening of these often-neglected muscles makes this pose extremely beneficial, whether you come high off the floor or not.
Locust Pose Basics
Sanskrit Meaning: Salabha (Locust) Asana (Pose)
Yoga Level: Beginner
Pose Type: Backbend
Benefits: Strengthens the muscles of your back, legs, and abdomen. Improves spinal flexibility and posture. Counters the effects of sitting.
Precautions: Avoid prone positions in later pregnancy. Substitute another backbend instead.
Props: Use a blanket or yoga pad under sensitive hip points.
Key Alignment Cues to Keep in Mind
- Find a slight anterior pelvic tilt by pressing your pubic bone down to create a strong point of contact with the floor.
- Engage your butt muscles to reinforce the anchoring effect of your pelvis.
- Lift your head to a neutral position. Keep your gaze level or even slightly down.
- Ride the waves of your breath, letting the inflation of your lungs with each inhalation float your chest a little higher.
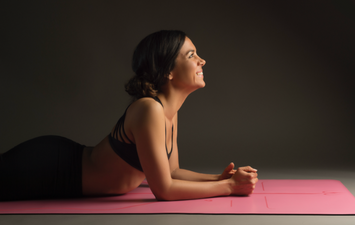
Step by Step Instructions
- Come to lie down on your stomach with your chin or forehead on the floor and your arms along your sides, palms facing down.
- Anchor your pelvis to your mat as described above.
- Press down into the tops of your feet to engage your legs and lift your knees away from the floor.
- Press down into the palms of your hands.
- On an inhalation, lift your head and shoulders off the mat any amount.
- Release your shoulders away from your ears and move your shoulder blades toward your spine.
- Hold this position for several breaths, letting each inhale lift you a little higher.
- Release your head and shoulders to the floor on an exhalation and turn your cheek to one side to rest for a few breaths.
- For your second round, go through the stages above, but also lift your arms off the floor, winging them out behind you.
- For your third round, lift your head, shoulders, arms, and legs away from the ground. Since your feet were one of your points of resistance, don’t be surprised if your chest is a little lower now.
- Engage your buttocks, legs, and feet, including your toes.
- After several breaths, release everything to your mat and rest.
Beginner Tips
- Don’t worry if you can only lift your chest an inch or two. It takes time and consistent practice to develop the strength, flexibility, and body awareness to come up higher.
- Pay attention to the position of your head. You don’t want to let your head hang down, but you don’t want to crank it back either. Let your neck be the natural exertion of your spine.
- Get a friend to stand on your feet. When the feet are under pressure, it’s much easier to lift your chest and it feels amazing.
 Variations
Play around with different arm positions such as taking the arms in a cactus shape, interlacing your hands behind your back, or extending the arms in front of you like Superman.
Front to Back
Back bending from a prone position doesn’t come naturally to most people, which is one of the reasons it’s so valuable to include in your practice. If you want more Salabhasana in your life, bring it into your Vinyasa sequence in the place of Cobra or Upward Facing Dog.
Featured Yoga Mat: Liforme Yoga Mat in Blue