Modern shoulders have a lot to carry, which can sometimes lead to discomfort and pain. Yoga can help prevent shoulder pain by strengthening the muscles that support the joint, releasing tension through stretching, and improving mobility.
Precautions
If you have shoulder pain that is severe and/or chronic, go see a healthcare provider before embarking on any new routines. Your condition may require individualized physical therapy, which can be very effective for the shoulders. Since there are many causes of shoulder pain, be sure to ask if there are any types of movements or stretches that you should avoid for your specific situation.
🧘 Tip from a Yogi
"If you are a long-time yogi with shoulder pain, check your Chaturanga. Doing this pose year after year with even the smallest misalignment can result in wear and tear, which in turn results in pain. It may be time to take a break from Chaturanga and then return with a shoulder-sensitive approach to your alignment."
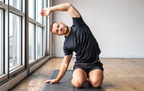
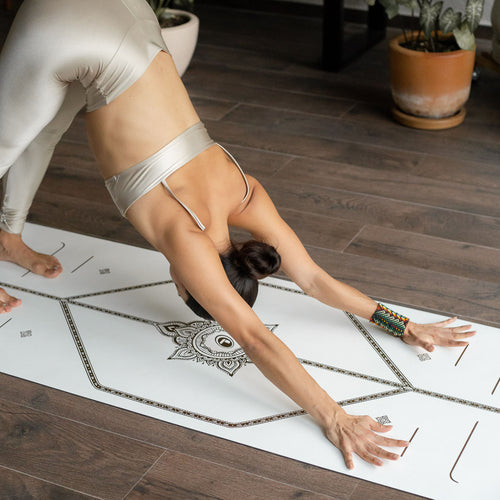
The 11 Best Yoga Poses for Shoulders
 Featured Yoga Mat: Blossoming Lotus in Purple
Cat-Cow Stretch (Marjaryasana – Bitilasana)
Sanskrit Meaning: Marjary (Cat) Asana (Pose) Bitilia (Cow) Asana (Pose)
Yoga Level: Beginner
Pose Type: Kneeling
Why This Pose: A good way to warm up your shoulder joints before stretching
Step-by-Step Instructions:
1. Begin on your hands and knees with your wrists under your shoulders and your knees under your hips.
2. On your inhales, lift your head and tail while lowering your belly.
3. On your exhales, drop your head and tuck your tail while rounding your spine toward the ceiling.
4. Repeat these motions for five to ten rounds of breath.
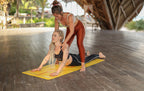
 Featured Yoga Mat: Tropical Paradise
Thread the Needle (Urdhva Mukha Pasasana)
Sanskrit Meaning: Urdhva (Upward) Mukha (Facing) Pasa (Noose) Asana (Pose)
Yoga Level: Beginner
Pose Type: Kneeling
Why This Pose: Stretches the shoulder blades and trapezius
Step-by-Step Instructions:
1. Begin in a Hands-and-Knees Position
2. On an inhalation, lift your right arm toward the ceiling.
3. On an exhalation, thread your right arm under your left arm and lower your right shoulder and cheek to the floor.
4. Extend your left arm toward the front of your mat, coming onto your fingertips.
5. Stay for five to ten breaths, then repeat on the other side.
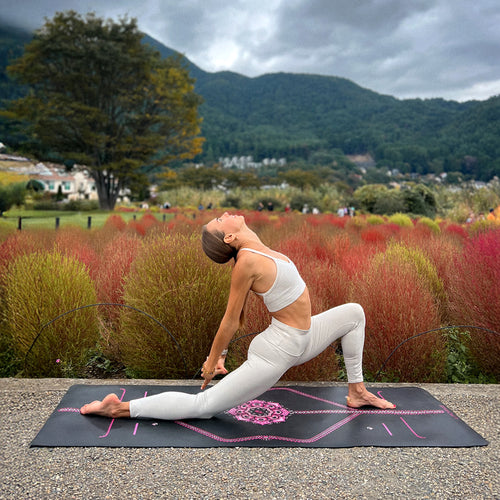
 Featured Yoga Mat: Liforme Classic Yoga Mat in Purple
Puppy Pose (Uttana Shishosana)
Sanskrit Meaning: Uttana (Intense) Shisho (Puppy) Asana (Pose)
Yoga Level: Beginner
Pose Type: Kneeling
Why This Pose: A deep shoulder stretch
Step-by-Step Instructions:
1. Begin on your hands and knees.
2. Walk your hands forward while keeping your hips over your knees.
3. Lower your chest, chin, or forehead to the floor with your arms outstretched.
4. Take five or more deep breaths before coming out.
 Featured Yoga Mat: Cosmic Moon in Dusk Blue
Standing Crescent Pose
Yoga Level: Beginner
Pose Type: Standing
Why This Pose: A nice shoulder stretch
Step-by-Step Instructions:
1. Begin in Raised Hands Pose (Urdhva Hastasana)
2. Interlace your hands overhead.
3. Draw your shoulders down away from your ears.
4. Inhale and lengthen your spine.
5. Exhale and take your clasped hands to the right.
6. Continue drawing your shoulders down.
7. After five to ten breaths, return to the center and repeat on the left side.
 Featured Yoga Mat: Liforme Classic Yoga Mat in Deep Forest Green
Downward Facing Dog (Adho Mukha Svanasana)
Sanskrit Meaning: Adho (Downward) Mukha (Face) Svana (Dog) Asana (Pose)
Yoga Level: Beginner
Pose Type: Standing
Why This Pose: Strengthens your deltoids, shoulder flexors, and rotator cuffs.
Step-by-Step Instructions:
1. Begin on your hands and knees.
2. Curl your toes under and straighten your legs to lift your seat toward the ceiling.
3. Press into your palms, rotate your upper arms outward, and let your head hang heavy.
4. Stay five to ten breaths.

Plank (Phalakasana)
Sanskrit Meaning: Phalaka (Plank) Asana (Pose)
Yoga Level: Beginner
Pose Type: Arm Support
Why This Pose: Strengthens the rotator cuff muscles and deltoids
Step-by-Step Instructions:
1. Begin in Downward Facing Dog.
2. Lower your hips and bring your shoulders over your wrists.
3. Establish a straight line from your crown to your heels.
4. Rotate your upper arms outward.
5. If your hips start to dip or pike, lower to your knees.
6. Hold at least ten breaths or up to a minute.

Warrior II (Virabhadrasana II)
Sanskrit Meaning: Virabhadra (Hindu Warrior) Asana (Pose)
Yoga Level: Beginner
Pose Type: Standing
Why This Pose: Your shoulder muscles are working against gravity to support your arms.
Step-by-Step Instructions:
1. From Downward Facing Dog, step your right foot inside your right hand.
2. Come up to stand with your right knee bent over the ankle and your left leg straight.
3. Turn your left foot parallel to the short end of your mat and point your hips toward the long side of your mat.
4. Take your arms parallel to the floor with the right arm forward and the left arm back.
5. Maintain this position for five to ten breaths, then repeat on the other side.
 Featured Yoga Mat: Black & Gold
Humble Warrior
Yoga Level: Beginner
Pose Type: Standing
Why This Pose: Improves flexibility and mobility.
Step-by-Step Instructions:
1. Begin in Warrior I with your right foot forward.
2. Interlace your hands behind your back with your arms straight.
3. On an exhalation, forward fold inside your right leg.
4. Bring your interlaced hands overhead, then release them over your head.
5. After five to ten breaths, return to standing and repeat on the other side.
 Featured Yoga Mat: Liforme Classic Yoga Mat in Grey
Cow Face Arms (Gomukhasana)
Sanskrit Meaning: Go (Cow) Mukha (Face) Asana (Pose)
Yoga Level: Intermediate
Pose Type: Seated
Why This Pose: Improves shoulder mobility
Precautions: Avoid if you have a rotator cuff injury.
Props: Strap
Step-by-Step Instructions:
1. Sit in a comfortable position like Easy Pose (Sukhasana) or Hero Pose (Virasana) with a block under your seat.
2. Take a strap in your right hand and lift your right arm straight up.
3. Bend your elbow and bring your right hand to your back between your shoulder blades.
4. Take your left arm parallel to the floor.
5. Bend your left elbow and bring your left hand up the center of your back.
6. Grab the strap that you are holding in your right hand with your left hand.
7. Keep your neck and spine upright.
8. Hold for five to ten breaths, then release and do the other side.

Bridge Pose (Setu Bandhasana)
Sanskrit Meaning: Setu (Bridge) Bandha (Lock) Asana (Pose)
Yoga Level: Beginner
Pose Type: Supine
Why This Pose: Stretches the deltoids, strengthens the shoulder blade support muscles
Step-by-Step Instructions:
1. Begin lying on your back with your knees bent and pointing at the ceiling.
2. Press into your feet and engage your glutes to lift your hips off the floor.
3. Interlace your hands behind your back and tuck your shoulders under one at a time.
4. Breathe here for five to ten breaths, then release your hands and lower your hips.
 Featured Yoga Mat: Cosmic Moon in Black
Headstand Pose (Salamba Sirsasana I)
Sanskrit Meaning: Salamba (Supported) Sirsa (Head) Asana (Pose)
Yoga Level: Advanced
Pose Type: Inversion
Why This Pose: Shown to relieve rotator cuff pain
Precautions: Avoid inversions if you have glaucoma
Step-by-Step Instructions:
1. Begin in a hands-and-knees position.
2. Interlace your hands.
3. Place the crown of your head on the floor and cradle the back of your head with your interlaced hands.
4. Curl your toes under and straighten your legs to lift your hips toward the ceiling.
5. Walk your feet toward your elbows.
6. Press down under your forearms.
7. Stay here or lift your legs one at a time with control (no kicking!) to bring your ankles over your hips.
8. Stay here for five to ten breaths, then lower one leg at a time with control.
Benefits of Yoga for Shoulder Pain
-
Strengthening muscles that support the shoulder so there is less strain on the joint.
-
Increased flexibility in the upper back, trapezius, and deltoid muscles, among others, to improve range of motion.
-
Stretching to release tension.
Tips for Practicing Yoga for Shoulder Pain
1. Listen to your shoulders
Don’t force any movements, especially if your shoulders are talking to you. Never push through pain.
2. Use props
A strap is a great prop for tight shoulders. You can use it in any pose to make connections that you can’t otherwise reach
3. Adapt as necessary
If it hurts to hold your arms overhead, for instance, choose a different variation for your arms. Take a break from Chaturanga if it’s painful. Sometimes you have to avoid certain positions while you rehab an injury.
3. Practice regularly
Consistency is key. It’s better to do a short practice each day than a longer session infrequently.
Yoga Poses to Avoid if You Have Shoulder Pain
Modify or avoid positions that cause pain. These can vary depending on your body, but could include:
- Poses in which your arms are weight-bearing
- Overhead arm extensions
- Deep shoulder stretches
- Binds
Shoulder On
Shoulder pain is unpleasant, but luckily treatable with physical therapy in many cases. You can often continue to practice yoga if you listen to your body and avoid positions that exacerbate your irritation. To prevent shoulder pain, pay close attention to your alignment in Chaturanga and incorporate poses that strengthen and stretch the shoulder support muscles in your regular practice.
FAQs About Yoga for Shoulder Pain
Can yoga help with shoulder pain?
It can, but it’s best to see a healthcare provider to find out which positions to avoid and which are beneficial to promote healing, since there are many causes of shoulder pain.
Which yoga pose is best for shoulder pain relief?
It really depends on what’s causing your pain. There’s no single pose that’s best in all cases.
Is yoga safe if I have a shoulder injury?
Often, you can continue to do yoga with a shoulder injury if you adapt poses that cause pain. Get a diagnosis and ask what kinds of movement to avoid
How often should I practice yoga for shoulder pain?
Consistency yields the best results, so try to practice on a regular schedule three to seven days a week.
Can I do these poses if I have frozen shoulder?
Possibly! Ask your doctor or physical therapist what to avoid and what may help.
Do I need props or equipment for shoulder yoga?
A strap and a block can be handy, but you can improvise with a regular belt or some cushions if you don’t have yoga props.