Handstands, Headstands, Forearm stands: these are some of the yoga inversions you’ve probably seen and perhaps aspired to practice. But these poses aren’t the only ways to get the benefits of being upside down. Inversions include a whole host of other postures, some of which require balancing and feats of strength and others that are much more gentle.
What Are Inversions?
Inversions are any yoga poses in which your heart is above your head. This includes hand balancing postures, but also standing, supine, and back bending poses. Some of these poses are very challenging while others are actually relaxing.
What Are the Benefits of Yoga Inversions?
1. Improved circulation
Going upside down can improve your blood circulation. Other types of yoga poses and movement practices are also good for the circulatory system.
2. Core Strength
Balancing in poses in which your feet are off the floor strengthens your abdominal muscles.
3. Brain Break
Any yoga pose that is physically challenging enough to occupy your full attention gives you a much-needed break from your brain’s constant chatter.
4. Fun and Rewarding
Gravity-defying poses are fun to work on and rewarding to master.
What Are the Risks Yoga Inversions?
1. Glaucoma
People with this condition should avoid inversions, which can increase pressure in the eyes.
2. High Blood Pressure
Most people with high blood pressure can safely practice gentle inversions but should avoid more advanced inversions. Ask your doctor if you are unsure.
3. Pregnancy
Any pose that involves the risk of falling should be avoided during pregnancy. This varies depending on the type of yoga practice you had before getting pregnant.
4. Neck Injuries
Avoid Headstands and Shoulderstand/Plow if you have a neck injury. Again, ask your doctor for recommendations for your specific condition.
15 Yoga Inversions

Headstand (Salamba Sirsasana I)
Sanskrit Meaning: Salamba (Supported) Sirsa (Head) Asana (Pose)
Yoga Level: Advanced
Step-by-Step:
1. Begin on your hands and knees.
2. Bring your elbows to the floor and clasp your hands together, interweaving your fingers.
3. Lower your head to the floor so that you crown is on the ground and the back of your head is held by your interwoven fingers.
4. Straighten your legs and lift your hips into a Downward Facing Dog Position.
5. Walk your feet in as close to your face as possible.
6. Lift one leg at a time away from the floor.
7. One you have both legs up, engage your feet.
8. After several breaths, lower one leg at a time back to the floor.

Tripod Headstand Headstand (Salamba Sirsasana II)
Sanskrit Meaning: Salamba (Supported) Sirsa (Head) Asana (Pose)
Yoga Level: Advanced
Step-by-Step:
1. Begin in Wide-Legged Standing Forward Bend Pose (Prasarita Padottanasana)
2. Lower the crown of your head to the floor.
3. Bend your elbows and place your palms flat on the floor with your elbows directly over your wrists.
4. Make sure your head and two hands form a triangle shape.
5. Lift your feet away from the floor and bring your legs out to the sides to come up.
6. After several breaths, take your legs wide to lower.

Dolphin Pose (Ardha Pincha Mayurasana)
Sanskrit Meaning: Ardha (Half) Pincha (Feathered) Mayur (Peacock) Asana (Pose)
Yoga Level: Intermediate
Step-by-Step:
1. Begin on your hands and knees.
2. Lower your forearms to the mat. Keep them parallel.
3. Straighten your legs and lift your hips into a Downward Facing Dog position while keeping your forearms on the floor. Your head stays off the floor.
4. Walk your feet toward your elbows any amount.

Forearm Stand (Pincha Mayurasana)
Also Known As: Feathered Peacock Pose
Sanskrit Meaning: Pincha (Feather) Mayura (Peacock) Asana (Pose)
Yoga Level: Advanced
Step-by-Step:
1. Begin in Dolphin Pose
2. Lift one leg straight up.
3. Come onto the ball of your other foot and take your weight into your arms.
4. Lift your second foot away from the floor.
5. If your legs are in a split position, bring them together overhead.

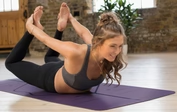
Scorpion Pose (Vrschikasana)
Sanskrit Meaning: Vrschika (Scorpion) Asana (Pose)
Yoga Level: Advanced
Step-by-Step:
1. From Forearm Stand, lift your head and lower your feet toward your head as you bring your spine into extension.
2. Eventually, your feet may come to meet the crown of your head.

Handstand (Adho Mukha Vrksasana)
Sanskrit Meaning: Adho (Downward) Mukha (Facing) Vrksa (Tree) Asana (Pose)
Yoga Level: Advanced
Step-by-Step:
1. Begin in Downward Facing Dog.
2. Walk your feet forward several steps
3. Lift one leg into a Downward Facing Dog split.
4. Bend your other knee and lightly swing your lifted leg to lift both feet off the floor.
5. Once both feet are up, draw them overhead and keep them actively engaged.
6. There are many ways to enter a Handstand. See our Handstand Guide for more in-depth instruction.

Plow Pose (Halasana)
Sanskrit Meaning: Hala (Plow) Asana (Pose)
Yoga Level: Intermediate
Step-by-Step:
1. Lie down on your back with your knees bent and soles of your feet on the floor.
2. Lift your legs straight up toward the ceiling.
3. Use your abs to lower your feet to the floor behind your head.
4. Roll your shoulders under and interlace your hands behind your back with your arms straight.
5. After several breaths, release your hands and roll your spine onto the floor to bring your feet back overhead.

Shoulder Stand (Salamba Sarvangasana)
Sanskrit Meaning: Salamba (Supported) Sarvanga (Whole body) Asana (Pose)
Yoga Level: Intermediate
Step-by-Step:
1. Begin in Plow Pose.
2. Release your hands and bend your elbows to bring your hands to the middle of your back with your fingertips pointing up. Keep your elbows hugging your sides.
3. Lift your legs to perpendicular one at a time.
4. Keep your head still.

Ear Pressure Pose (Karnapidasana)
Sanskrit Meaning: Karna (Ear) Pida (Pressure) Asana (Pose)
Yoga Level: Intermediate
Step-by-Step:
1. Begin in Plow Pose.
2. Bend your knees and hug them to either side of your head.
3. The tops of your feet and shins stay in contact with your mat.

Downward Facing Dog Pose (Adho Mukha Svanasana)
Sanskrit Meaning: Adho (Down) Mukha (Face) Svana (Dog) Asana (Pose)
Yoga Level: Beginner
Step-by-Step:
1. Begin on your hands and knees.
2. Curls your toes under and straighten your legs to lift your hips toward the ceiling.
3. Press into your palms and release your heels toward the floor.

Bridge Pose (Setu Bandhasana)
Sanskrit Meaning: Setu (Bridge) Bandha (Lock) Asana (Pose)
Yoga Level: Beginner
Step-by-Step:
1. Lie on your back with your knees bent and the soles of your feet flat on the floor close to your butt and your arms alongside your body.
2. On an inhalation, press into your feet and engage your glutes to lift your pelvis toward the ceiling.
3. Tuck your shoulders under to expand your chest.
4. Interlace your hands behind your back or hold onto the sides of your mat.
5. After several breaths, release your hands and lower your pelvis to the floor on an exhalation.

Wheel Pose (Urdhva Dhanurasana)
Sanskrit Meaning: Urdhva (Upward) Dhanu (Bow) Asana (Pose)
Yoga Level: Intermediate
Step-by-Step:
1. Lie on your back with your knees bent and the soles of your feet flat on the floor.
2. Bend your elbows and bring your palms flat on the mat on either side of your head.
3. On an exhalation, press into your palms and feet while using your glutes to lift your pelvis toward the ceiling.
4. Straighten your arms.
5. Let your head hang heavy.
6. After several breaths, tuck your chin and bend your elbows to release your body to the floor.

Standing Forward Fold (Uttanasana)
Sanskrit Meaning: Uttana (Intense) Asana (Pose)
Yoga Level: Beginner
Step-by-Step:
1. Begin in Mountain Pose.
2. Inhale and lift your arms overhead.
3. Exhale and bring your arms out to either side as you tip your pelvis forward to bend your torso over your legs.
4. Bring your hands to the floor, blocks, or let them hang.
5. Release your head and neck.

Child’s Pose (Balasana)
Sanskrit Meaning: Bala (Child) Asana (Pose)
Yoga Level: Beginner
Step-by-Step:
1. Begin on your hands and knees.
2. Separate your knees to either side of your mat and bring your big toes to touch at the Centre Line.
3. Bring your butt back to your heels and your forehead to the mat.
4. Stretch your arms in front of you or bring them alongside your body.

Legs Up the Wall Pose (Viparita Karani)
Sanskrit Meaning: Viparita (Inversion) Karani (To Do) Asana (Pose)
Yoga Level: Beginner
Step-by-Step:
1. Bring your mat and a bolster or several blankets over to a wall.
2. Place the bolster or a stack of folder blankets alongside the wall.
3. Come to sit on the bolster with your knees bent into your chest and one side of your body touching the wall.
4. Roll onto your back while taking your legs up the wall.
5. Your butt will be on the bolster, but your back will be on the mat.
Why We Love Inversions
Any time you can take your body into positions that are outside of the norm, it’s going to be beneficial. Since our heads are usually the highest points of our bodies and our feet the lowest, inversions take us out of our usual patterns. This is good for the body and the mind as it teaches us new skills and breaks habits.