Even if you’ve never stepped onto a yoga mat, chances are that you’ve heard of Downward Facing Dog, also known by its Sanskrit name, Adho Mukha Svanasana. This pose is closely associated with yoga in the popular imagination for good reason.
It’s done repeatedly throughout vinyasa-style classes as a transition pose, a place to catch your breath, and for its own benefits. But just because Downward Facing Dog is common doesn’t mean that it’s a simple pose.
There are actually quite a few subtle yet important alignment points to implement throughout this pose to experience the full benefits of Downward Facing Dog. In this guide, we’re going to go over them, along with a few common pitfalls, to help you get the most out of this posture every single time.
Step-by-Step Instructions for Downward Facing Dog
- Begin on your hands and knees with your wrists stacked under your shoulders. Extend your legs back and come into a Plank position to find the right hand-to-foot distance. Don’t worry, we won’t stay here long! (NB: pushing back directly from a hands and knees position can result in a short Downward Dog.)
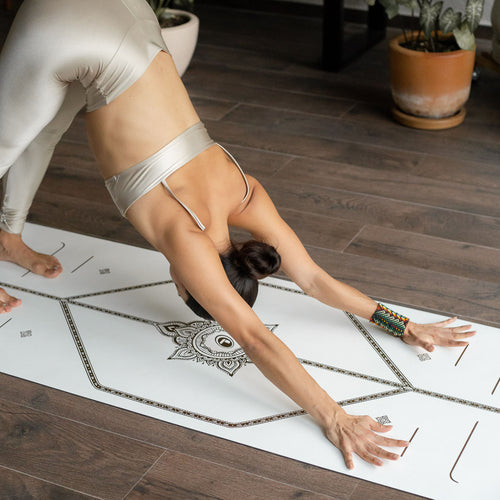
- From Plank, press into your palms and lift your hips, drawing them toward the ceiling. Have the shape of an inverted V in your mind.
- Bend your knees deeply and come onto the balls of your feet, pointing your sitting bones toward the ceiling. This relieves hamstring tension and helps keep your pelvis neutral.
- Once you’ve done that, you can re-straighten your legs or keep them bent a little (or a lot) if your hamstrings feel tight.
- Now, release your heels toward the floor. They don’t have to touch the floor, but they should have weight in them. They usually hover just above the ground. Don’t stay up on the balls of your feet.
- Engage your quads and aim for a slight inner rotation of the thighs to help spread your sit bones.
- Spread your fingers wide and press down into the full length of each finger. This will slightly dome your palms (Hasta Bandha), which helps reduce wrist strain. Keep wrist creases parallel, meaning that your hands are neither turned inward nor outward. Activating your hands properly can make a big difference in your practice, helping you feel more stable in the pose.
- Line up your inner elbow creases with your wrist creases, keeping elbows slightly soft to prevent wear and tear on your shoulders over time. It also helps give your upper arms an external rotation, which broadens the shoulder blades and allows you to release your neck.
- Let your head hang heavy. Avoid collapsing your upper spine by keeping your shoulder blades separated, your belly softly toned, and your ribs knitted together to maintain a straight, supported spine.
- Breathe deeply.

🧘 Tip from a Yogi
Downward Facing Dog is considered a resting posture, but if you find it anything but restful, don’t worry. Try modifying the pose by bending your knees, and make sure that your legs are doing their share of the work by pressing strongly through your palms. The pose will get more comfortable over time. And you can always substitute Child’s Pose for a rest as you build strength and flexibility.
Downward Facing Dog Basics
Sanskrit Meaning: Adho (Downward) Mukha (Face) Svana (Dog) Asana (Pose)
Yoga Level: Beginner
Pose Type: Standing, forward bend, inversion
Pose Category: Full-body stretch, resting pose
Benefits of Downward Facing Dog
- Stretches the hamstrings and calves
- Strengthens the arms, legs, and back
Key Alignment Cues
-
Feet Hip-Distance Apart
Your feet should not be as wide as the mat. Neither should they be touching. They should be hip-distance apart. A lot of people overestimate that distance. -
Use the Femur Line as a Guide
Picture drawing a line straight up the femur (thigh bone) that inserts into your pelvis on each side, then extend that line down each leg so it shoots out to your heels. -
Keep Your Feet Parallel
The outer edges of your feet should run parallel to one another, which may mean that your toes are turned in ever so slightly. -
Let the Legs Take the Weight
When the feet are in this position, your legs can support their fair share of weight, making the pose feel more stable and balanced.

Why We Practice Downward Facing Dog
Downward Facing Dog is more than just a transition pose; it’s a moment to pause, check in with your body, and build lasting strength and awareness.
If it doesn’t feel comfortable to you right away, don’t worry; this pose shows up so often in vinyasa flows that you’ll have ample opportunities to settle into it throughout your lifelong practice. It may eventually start to feel a little too familiar, and if that happens, try exploring and experimenting with Downward Facing Dog variations to keep your practice fresh, dynamic, and fun!
Downward Facing Dog FAQs
What are some common mistakes in Downward Facing Dog?
One of the most common mistakes is placing the feet too wide or too close together - your feet should be hip-distance apart. Rounding your lower back can be avoided by slightly bending the knees to maintain spinal length, while collapsing shoulders can be prevented by pressing firmly into your palms and separating your shoulder blades.
Are there any modifications for Downward Facing Dog?
Yes! If your hamstrings are tight, try keeping your knees bent. If you have wrist pain or sensitivity, Dolphin Pose is a good alternative.
Is Downward Facing Dog beginner-friendly?
Downward Facing Dog is often considered a beginner pose, but it can feel challenging if you have tight hamstrings or shoulders or limited flexibility. Modifications and consistent practice will improve strength and mobility, making the pose more comfortable and stable over time.


