
We love the challenge of advanced yoga balances, but most people don’t pull up to their first yoga class ready to launch into a full King Dancer. Instead, we work up to big balances by doing a lot of more accessible poses over time.
This guide walks you through 15 yoga poses for improving balance, grouped by level, so you can practice in a way that feels safe and achievable.
Can Yoga Help Build Balance?
Yes! The core strength, body awareness, and upper and lower body integration you get from doing yoga regularly will improve your balance tremendously, both for tricky yoga postures and healthy aging.
While yoga’s many balancing postures (including standing poses, arm balances, and inversions) give you obvious opportunities to practice balancing, all the other postures you do during a well-rounded yoga class also help you build strength and flexibility in your feet, legs, hips, and core, supporting better balance in both your yoga practice and daily life.
Yoga for Balance Key Alignment Cues
1. Gaze and Head Position
Your head is heavy, so if you tilt it to one side or look down, it can throw you off balance. Be aware of the position of your head and your gaze in every pose.
2. Hip Alignment
A tilted pelvis makes balancing much harder. Get familiar with closed vs open hips in yoga and always check that your hip points are level and facing the right direction.
3. Responsive Legs
Some styles of yoga teach you to lock your knees in standing postures, but a slight bend in the knee allows your body to make the continuous adjustments that contribute to better balance.
4. Wider is More Stable
If you have trouble balancing in standing poses, step your feet wider apart toward the sides of your mat for a more stable base. On the other hand, if you are looking to challenge your balance, take the feet closer together.
Yoga Balance Poses for Beginners

Mountain Pose (Tadasana)
Sanskrit Meaning: Tada (Mountain) Asana (Pose)
Yoga Level: Beginner
Pose Type: Standing
Benefits: Strengthens your legs, improves body awareness
Why this Pose: Many standing balances are based on the alignment of Mountain Pose, so it creates a solid foundation you can build upon.
Step-by-Step Instructions:
- Stand at the front of your mat with your feet touching or slightly parted.
- Let your arms rest by your sides with your palms facing forward.
- Stack your joints: shoulders over pelvis, pelvis over knees, knees over ankles.
- Engage your legs and core.
- Keep your neck long and your gaze neutral, looking straight ahead.

Chair Pose (Utkatasana)
Sanskrit Meaning: Utkata (Powerful) Asana (Pose)
Yoga Level: Beginner
Pose Type: Standing
Benefits: Strengthens your legs and core
Why this Pose: A foundational standing posture and a real leg workout that teaches you to feel your weight in your heels.
Step-by-Step Instructions:
- From Mountain Pose, bend your knees as if you are sitting back into a chair, sending your hips back and your chest forward.
- Take your weight into your heels.
- Lift your arms overhead. Because of the angle of your chest, they’ll be at a diagonal.
- Keep your knees pointing straight ahead and tracking over your toes.

Downward Facing Dog (Adho Mukha Svanasana)
Sanskrit Meaning: Adho (Down) Mukha (Face) Svana (Dog) Asana (Pose)
Yoga Level: Beginner
Pose Type: Standing/Inversion
Benefits: Stretches and strengthens your arms, legs, core, and back.
Why this Pose: While the chances that you’ll tip over in a Down Dog are minimal, this posture helps your balance in many ways, including by improving your body awareness and core integration.
Step-by-Step Instructions:
- From a hands and knees position, curl your toes under and lift your hips up and back to straighten your legs, bringing your body into an inverted V position.
- Release your heels towards the floor and press strongly into your hands from fingertips to palms.
- Check to make sure that your hands are equidistant from your central line. Do the same for your feet.
- Take your gaze to your toes to keep your neck neutral.

Plank Pose (Phalakasana)
Sanskrit Meaning: Phalaka (Plank/Board) Asana (Pose)
Yoga Level: Beginner
Pose Type: Arm Support
Benefits: Strengthens the arms and core.
Why this Pose: One word: core. Holding a plank position requires a lot of core strength, so it’s also one of the best ways to build it.
Step-by-Step Instructions:
- From a hands and knees position, step your right leg straight back with your toes tucked under and the ball of your foot on your mat.
- Take your left leg back into the same position so your body forms a straight line from head to heels.
- Make sure your shoulders stay directly stacked over your wrists. Spread and activate your fingers.
- Draw your belly button in toward your spine and engage your glutes.
- If your hips begin to sag or lift too high, lower your knees to the mat but keep a straight line from your head to your knees.

Boat Pose (Navasana)
Sanskrit Meaning: Nava (Boat) Asana (Pose)
Yoga Level: Beginner
Pose Type: Seated
Benefits: Strengthens your core and hip flexors.
Why this Pose: A powerful pose that helps strengthen the core to support better balance.
Step-by-Step Instructions:
- Sit on your mat with your knees bent and your feet flat.
- Hold onto the backs of your thighs as you lean your upper body backwards and lift your feet off the floor.
- Bring your shins parallel to the floor.
- Release your hold on your legs if you can do so without your upper body collapsing.
- Extend your arms alongside your legs and turn your palms upwards.
- Stay here or straighten your legs to form a V shape with your body, keeping your spine long.

Crescent Lunge (Anjaneyasana)
Sanskrit Meaning: Anjani (Hindu Goddess) Asana (Pose)
Yoga Level: Beginner
Pose Type: Kneeling
Benefits: Stretches the quads, hamstrings, and hips. Strengthens the core.
Why this Pose: Not all balancing poses require you to stand on one leg. Having one leg forward and the other back requires you to use your core strength to stabilize yourself.
Step-by-Step Instructions:
- From Downward Facing Dog, step your right foot to the inside of your right hand and lower your left knee to your mat, taking a yoga pad under the knee if it is sensitive.
- Bring your hands to your hips to check that both hip points are facing forward.
- Either stay more upright or deepen your right knee to bring your hips forward.
- Take your arms overhead, relaxing your shoulders away from your ears.

Tree Pose (Vrksasana)
Sanskrit Meaning: Vrksa (Tree) Asana (Pose)
Yoga Level: Beginner
Pose Type: Standing Balance
Benefits: Improves leg strength, core strength, and balance
Why this Pose: A classic entry-level standing balance that lets you explore stability using familiar Mountain Pose alignment.
Step-by-Step Instructions:
- From Mountain Pose, shift your weight into your right leg without letting your hips drift to the side.
- Bend your left knee and lift your left foot off the floor.
- Using your hands if you need to, take the sole of your left foot to your inner right thigh, pointing your left knee to the left side of the room.
- Firm your core.
- Take your hands to your hips and check that they are still in Mountain Pose Position.
- When you feel steady, lift your arms overhead.

Corpse Pose (Savasana)
Sanskrit Meaning: Sava (Corpse) Asana (Pose)
Yoga Level: Beginner
Pose Type: Supine
Benefits: Rests the body
Why this Pose: It’s important to balance your movement with some rest.
Step-by-Step Instructions:
- Lie on your back, let your legs extend out comfortably, and close your eyes.
- Turn your palms to face the ceiling.
- Allow your feet to fall open.
- Relax every part of your body. Soften your jaw, shoulders, and belly.
- Rest with awareness for about 10 minutes.
Yoga Balance Poses for Intermediate & Advanced Practitioners

Eagle Pose (Garudasana)
Sanskrit Meaning: Garuda (Eagle) Asana (Pose)
Yoga Level: Intermediate
Pose Type: Standing Balance
Benefits: Stretches the hips, shoulders, and upper back. Improves core and leg strength.
Why this Pose: Builds a balancing posture off the foundation of Chair Pose.
Step-by-Step Instructions:
- From Chair Pose, lift your left foot away from the floor, keeping both hip points facing forward.
- Cross your left thigh over your right thigh.
- Hug your thighs together.
- If possible, hook your left foot around your right calf.
- Bring your hands to your hips to make sure they are still level and facing forward.
- Bring your arms out in front of you. Cross your right arm over the left at the elbows.
- Bend your elbows and bring your forearms perpendicular to the floor with your palms touching if possible.
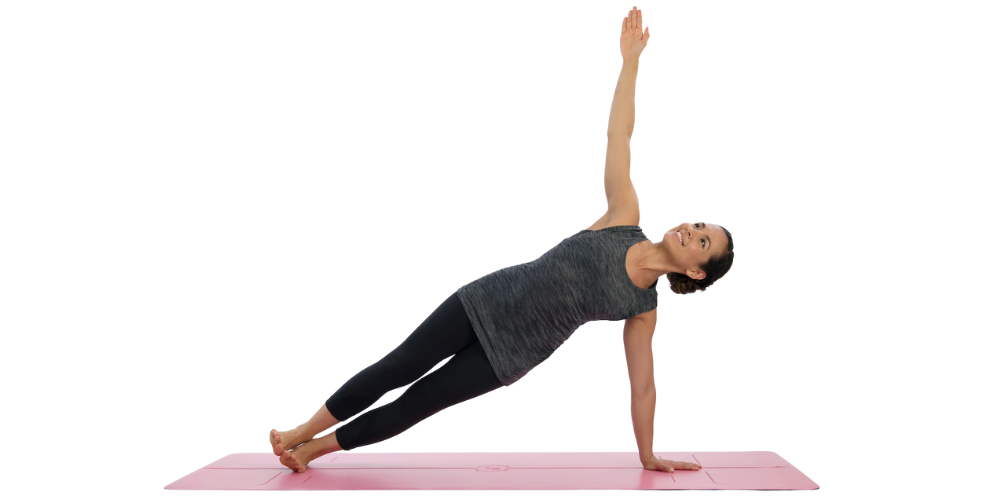
Side Plank Pose (Vasisthasana)
Sanskrit Meaning: Vasistha (An ancient poet and sage) Asana (Pose)
Yoga Level: Intermediate
Pose Type: Arm Support
Benefits: Strengthens the arms and core.
Why this Pose: Works your obliques, tests your lateral stability, and teaches you to balance on a narrow base of support.
Step-by-Step Instructions:
- From Plank Pose, shift your weight onto your right hand.
- Roll to the outer edge of your right foot and stack your left foot on top, flexing both feet strongly.
- Lift your left arm up toward the ceiling as you turn your chest to face the left side of your mat.
- Press firmly into your right hand and lift your hips toward the ceiling so your body forms a long diagonal line.
- Keep your neck long and gaze straight ahead or up at your top hand.

High Lunge
Sanskrit Meaning: Commonly practised without a single agreed Sanskrit name
Yoga Level: Intermediate
Pose Type: Standing
Benefits: Stretches and strengthens the hips and legs. Improves core strength.
Why this Pose: A high lunge is a deceptively difficult balance challenge. A little wobbling is normal here.
Step-by-Step Instructions:
- From Downward Facing Dog, step your right foot to the inside of your right hand.
- Come onto your fingertips, then engage your core to lift your hands away from the floor and bring your torso upright.
- Take your hands to your hips and square your pelvis to the front of your mat.
- Take your arms overhead.
- If you are very wobbly, try taking the feet towards the sides of your mat to create a wider base.
- Keep your right knee over your right ankle and bring your right thigh toward parallel with the floor.
- Keep your left leg straight and strong.

Revolved Lunge Pose
Sanskrit Meaning: Often taught as a variation of revolved standing lunge shapes rather than a single named pose
Yoga Level: Intermediate
Pose Type: Standing
Benefits: Stretches and strengthens the core, hips, and legs.
Why this Pose: Build on the balance challenge of a High Lunge by adding some rotation, which also works the core.
Step-by-Step Instructions:
- From High Lunge with our right leg forward, extend your arms out to the sides at shoulder height.
- Keeping your pelvis facing forward, twist your torso to the right, bringing your left arm in front of your body and your right arm behind.
- Turn your head to the right, but remember that the rotation is coming from your core, not your neck.
- If you have trouble keeping your torso upright, try slightly softening the back knee.

Half Moon Pose (Ardha Chandrasana)
Sanskrit Meaning: Ardha (Half) Chandra (Moon) Asana (Pose)
Yoga Level: Intermediate
Pose Type: Standing
Benefits: Strengthens the arms, legs, and core. Stretches the hamstrings, chest, back, and shoulders.
Why this Pose: A workshop on integration, body awareness, and muscular activation that really tests your balance.
Step-by-Step Instructions:
- From Downward Facing Dog, step your right foot next to your right hand.
- Move your right hand forward about 12–15 inches. Stay on your fingertips or a block.
- Bring your left hand to your left hip as you straighten your right leg and lift your left leg parallel to the floor.
- Stack your left hip over your right hip and your left shoulder over your right shoulder.
- Flex through your left foot to engage your whole left leg.
- Turn your face up toward the ceiling.
- For an extra balance challenge, hover your right fingertips a few inches away from the floor.

Extended Hand-to-Big-Toe Pose (Utthita Hasta Padangustasana)
Sanskrit Meaning: Utthita (Extended) Hasta (Hand) Padangusta (Toe) Asana (Pose)
Yoga Level: Intermediate
Pose Type: Standing Balance
Benefits: Strengthens your legs and core. Stretches the hips, hamstrings, and calves.
Why this Pose: Extending a leg in a standing balance requires core strength and coordination.
Step-by-Step Instructions:
- From Mountain Pose, shift your weight into your right leg while keeping your hips squared to the front of your mat.
- Lift your left foot off the floor, bending your left knee and hugging it toward your chest while continuing to stand upright.
- Reach inside your left thigh with your left hand to take your big toe in a yogi toe lock, or loop a yoga strap around the ball of your left foot.
- Extend your left leg toward the front of the room, keeping your spine perpendicular to the floor.
- If you can’t straighten your leg while holding your toe and keeping your spine tall, bend your knee slightly or use a strap to give yourself a longer reach.
- Stay here or open your hip, taking your left leg out to the left side.

Dancer Pose (Natarajasana)
Sanskrit Meaning: Nata (Dancer) Raja (King) Asana (Pose)
Yoga Level: Intermediate/Advanced
Pose Type: Standing Balance
Benefits: Improves leg and core strength. Stretches the abdominals, shoulders, and back.
Why this Pose: Controlling your balance while back-bending is a challenge for your abs.
Step-by-Step Instructions:
- From Mountain Pose, bend your left knee and reach your left hand back to grab the inside or outside of your left foot (try it both ways to see which feels better).
- Lift your right arm up toward the ceiling.
- Begin to simultaneously tilt your torso forward and lift your left thigh toward parallel to the floor while keeping your hips square to the front of your mat. The tension between your left hand and knee begins to bring your spine into extension.
- If you can go deeper, take your left foot into the crook of your left elbow.
- For the full expression of the posture, bring the torso more upright. Reach your right arm over your right shoulder to grab your left foot.
- Stay there or bring your left arm over the left shoulder to hold the foot as well.
Better Balance On and Off the Mat
Balance is both a physical and a mental state. While yoga postures focus on strengthening the muscles you need to stay upright for a good many years to come, the holistic practice of yoga is also working on your mind, bringing more balance to your life off the mat by subtly reinforcing what’s important and reminding us to leave the rest behind. While this type of work is more difficult to measure, you’ll notice its effects as you continue to practice over time.
Yoga for Balance FAQs
How often should I practise yoga for balance?
Any yoga you practice will help improve your balance over time. Try doing yoga two to three times a week to build strength, flexibility, and body awareness.
What are the best yoga balance poses for beginners?
Start with simple yoga balance poses for beginners, like Mountain, Chair, and Tree Pose. They build the body awareness and leg and core strength you need before you move on to trickier one-legged balances.
Can yoga poses for balance help as I get older?
Yes. Regularly practising yoga poses for balance helps maintain strength, mobility, and coordination, which can reduce your risk of falls and keep you more confident on your feet as you age.
Are yoga poses for improving balance enough, or do I need other exercise too?
Yoga poses for improving balance are a strong foundation, especially when they include strength and mobility work. You can combine them with walking, strength training, or other movement practices you enjoy.
What if I keep wobbling or falling out of balance poses?
Wobbling is part of learning and building strength, not a sign you’re doing it ‘wrong’. Use a wall or chair for support, take a wider stance, focus your gaze on a fixed point, and treat each time you fall out as another chance to step back in.


